When homeowners ask, “why is my solar street light blinking green,” they often expect one clear answer. Unfortunately, green indicators do not follow one universal standard. On many systems, a blinking green light shows active charging, normal operation, or a controller status signal. On others, it may indicate a weak battery, communication fault, or repeated restart.
James P. Dunlop, a respected photovoltaic systems specialist, offers a useful diagnostic principle: “Measure the system before replacing its parts.” That advice matters here. Check the light during strong daylight. Look for dust covering the solar panel, loose cable connections, or moisture inside the controller box. Then inspect the battery compartment for swelling, corrosion, or unusual heat. Small clues matter.
The timing can reveal more. A green blink only during daylight may suggest charging. A blink after sunset may point toward battery protection or a controller fault. If the lamp turns off before dawn, stored energy may be insufficient. Yet this conclusion can be wrong. Some manufacturers use green blinking for routine status updates.
The controller manual remains the most reliable reference. Product labels can be confusing. I have seen identical-looking lamps use different indicator codes. That is easy to overlook. Avoid changing parts by guesswork. Record the blinking pattern, weather conditions, and operating hours first. A technician can then test panel voltage, battery voltage, and controller output safely. This approach makes the question “why is my solar street light blinking green” more practical, measurable, and easier to resolve.
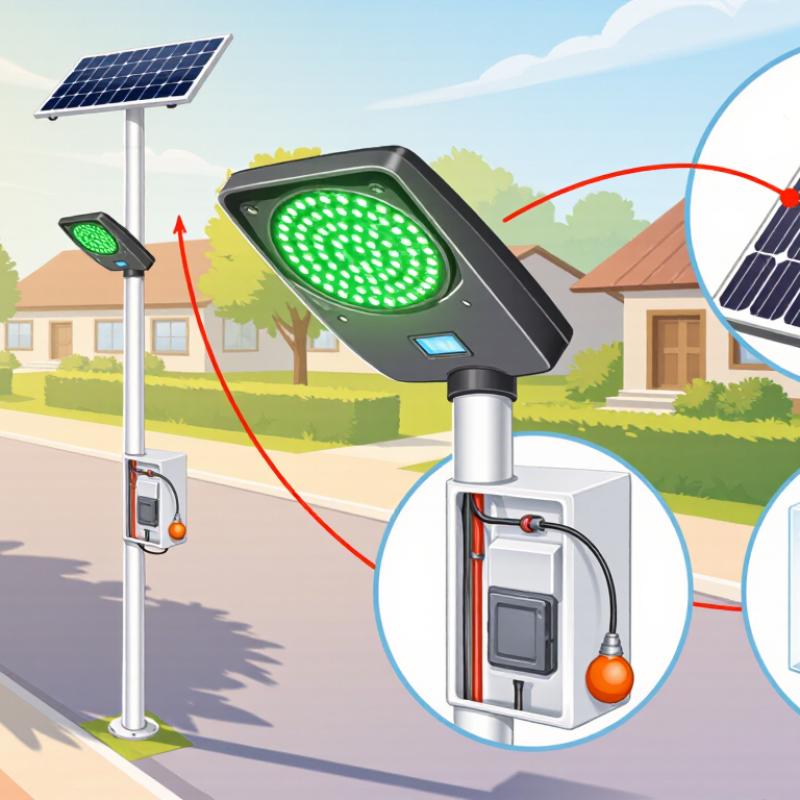
What Does a Blinking Green LED Mean in a Solar Street Light?
Why Is My Solar Street Light Blinking Green?
A blinking green LED usually shows that the solar street light is operating normally. However, its exact meaning depends on the controller’s design. In many systems, the light blinks while the panel charges the battery during daylight. It may also indicate that the battery has reached a healthy voltage and the lamp is waiting for nighttime operation. Some controllers use green flashes for a brief system check after installation.
The timing matters. If the LED blinks under strong sunlight, check whether the panel is clean and facing the open sky. Dust, leaves, or nearby branches can reduce charging power. At dusk, observe whether the lamp turns on after the green light changes pattern. A multimeter can help confirm the battery voltage, although readings vary with battery type and temperature. Inspect the cable terminals too. A loose connection can imitate a normal status signal.
Not every green blink is reassuring. Rapid flashes, weak nighttime brightness, or a lamp that switches off early may suggest low battery capacity, poor charging, or a controller warning. I have seen technicians assume “green means perfect,” then discover corrosion inside a connector. That assumption is easy to make. Check the installation manual before replacing parts, because one controller may use green for charging while another uses it for standby. Record the blink speed and the time of day. Small details often reveal the real condition.
Why Is My Solar Street Light Blinking Green?
A blinking green LED commonly indicates that the solar controller is charging the battery or that the system is operating normally. The exact meaning depends on the controller design, so confirm it with the light’s technical manual.
This example shows a typical 12 V lead-acid battery voltage pattern during a clear day: voltage rises while sunlight is available and gradually falls after sunset. If the green LED keeps blinking while the battery voltage remains low during daylight, inspect the solar panel wiring, battery condition, charge controller, and cable connections.
Check 12 V or 24 V Battery Voltage and Green-LED Status Codes
Why Is My Solar Street Light Blinking Green?
A blinking green light usually comes from the controller, not the lamp itself. It may indicate charging, normal operation, or a battery warning. Green-LED status codes are not universal. Check the controller’s label or service manual before replacing parts.
Measure the battery with a reliable multimeter. Turn off the lamp and wait several minutes before testing. A healthy 12 V lead-acid battery often reads about 12.6–12.8 V at rest. A 24 V battery bank may show approximately 25.2–25.6 V. Readings below 12.0 V or 24.0 V suggest deep discharge, weak cells, or poor connections. These values are not exact for lithium batteries.
Test again while the solar panel receives strong daylight. The voltage should rise if charging is working. Inspect loose terminals, corrosion, damaged cables, and water inside the enclosure. A green blink during charging can be normal. Rapid blinking, however, may signal low voltage, over-discharge, or a controller fault. Count the flashes and record their timing.
Do not trust color alone. I have seen green LEDs remain active while a battery was already losing capacity. Nighttime testing can also mislead because the lamp creates a temporary voltage drop. Compare readings across several evenings, and isolate the battery from the controller when safe and permitted by the equipment instructions. Disconnecting cables in the wrong order can damage the system.
Measure Solar Panel Output Under Full Sunlight and Load Conditions
Why Is My Solar Street Light Blinking Green?
A blinking green indicator does not always mean a fault. It may show charging, low battery protection, or a controller communication state. Check the measurements before replacing parts. I once blamed the controller, but the real problem was a shaded panel after a tree grew nearby.
Measure the solar panel during full sunlight, preferably around solar noon. Record panel voltage and current with the battery disconnected only when the controller allows it. Never place a meter across the panel in current mode. Multiply voltage by current to estimate output power. IEC testing uses 1,000 W/m² irradiance and 25°C cell temperature, but outdoor conditions rarely match these values. A panel rated at 100 watts may produce less in heat, haze, or partial shade. Look for stable readings, not one quick number.
Then test the light under its normal load. Record battery voltage before dusk, while the lamp operates, and after several hours. A sharp voltage drop can trigger green blinking through low-voltage protection. The NREL degradation study reports a median photovoltaic decline near 0.5% annually, although poor wiring can cause larger losses much sooner. IEA PVPS reports continued rapid solar deployment, yet field performance still depends on installation quality. Inspect connectors, cable resistance, panel angle, and moisture marks. My measurements can be imperfect, especially with changing clouds, so repeating the test matters.
Why Is My Solar Street Light Blinking Green? - Measure Solar Panel Output Under Full Sunlight and Load Conditions
| Test Condition |
Typical Solar Irradiance |
Panel Voltage |
Panel Current |
Panel Output |
Battery Voltage |
Street-Light Load |
Likely Green-LED Meaning |
Assessment |
| Full sunlight, panel disconnected from controller |
900–1,000 W/m² |
20–22 V DC open circuit |
0 A |
0 W measured under open-circuit conditions |
Not applicable |
Off |
Not applicable; the controller is not receiving panel current. |
Normal test result |
| Full sunlight, panel connected and battery charging |
900–1,000 W/m² |
17–19 V DC |
3.8–5.0 A |
65–90 W |
12.8–14.4 V DC |
Off or standby |
Often indicates charging or normal controller operation. |
Expected charging range |
| Full sunlight with LED lamp operating |
900–1,000 W/m² |
16–18 V DC |
3.0–4.5 A |
50–80 W |
12.4–14.0 V DC |
20–60 W LED load |
May blink while charging and supplying the lamp at the same time. |
Usually normal |
| Partial shade or heavy cloud |
200–600 W/m² |
15–19 V DC |
0.8–3.0 A |
12–55 W |
12.0–13.2 V DC |
0–60 W |
Intermittent blinking can occur as charging current rises and falls. |
Check weather and shading |
| Panel covered or tested at night |
0–10 W/m² |
0–2 V DC |
0 A |
0 W |
11.5–12.8 V DC |
0–60 W |
A green blink may indicate no solar input, standby, or a nighttime operating state, depending on the controller. |
Controller-specific indication |
| Full sunlight with loose or corroded panel connection |
900–1,000 W/m² |
Rapidly changing, often below 15 V DC |
0–1.0 A |
0–15 W |
12.0–12.8 V DC |
0–60 W |
Repeated blinking may indicate unstable charging or a poor connection. |
Inspect wiring and terminals |
| Full sunlight with a heavily discharged battery |
900–1,000 W/m² |
15–18 V DC |
2.0–4.5 A |
30–80 W |
Below 11.8 V DC |
Usually disabled or reduced |
Green blinking may show charging, while the lamp remains off to protect the battery. |
Verify battery condition |
| Full sunlight with an overloaded or shorted LED circuit |
900–1,000 W/m² |
15–19 V DC |
Normal panel current until protection activates |
Variable |
12.0–14.4 V DC |
Above rated load or short circuit |
Fast or repeating green flashes may accompany load protection. |
Disconnect and test the load |
Measurement guidance: Measure panel voltage in parallel and panel current with a suitable DC current meter or clamp meter. Record readings after the panel has faced unobstructed sunlight for several minutes. Panel output changes with irradiance, temperature, panel angle, battery state of charge, wiring resistance, and controller type. A green blinking pattern is not standardized across all solar street-light controllers, so confirm the meaning with the controller’s wiring label or technical manual.
Test Battery Capacity Against the Common 80% End-of-Life Standard
Why Is My Solar Street Light Blinking Green?
A blinking green light often signals charging, standby, or a controller warning. The exact meaning depends on the controller design. Do not diagnose the battery from the lamp color alone. I have seen lights blink normally at noon, then fail before dawn after several cloudy days. The more useful test is remaining capacity.
The common 80% end-of-life benchmark means the battery stores only four-fifths of its original rated capacity. It is not a universal failure rule, but it is widely used for rechargeable energy systems. The U.S. Department of Energy’s Energy Storage Grand Challenge Roadmap identifies capacity retention as a key lifetime metric. IEC 61427-1 also requires renewable-energy batteries to be evaluated under realistic charge and discharge conditions. These reports support testing under load, not relying on voltage alone.
Record the battery’s rated ampere-hours, then fully charge it under safe operating conditions. Disconnect the solar panel and apply a controlled load close to the light’s normal demand. Measure current and time until the controller reaches its low-voltage cutoff.
Capacity equals average current multiplied by discharge hours.
A 20 Ah battery delivering 15.8 Ah has reached about 79%, near the 80% threshold. Temperature matters; cold weather can temporarily reduce output. An imperfect test is still better than guessing. Repeat it after warming the battery, and check loose terminals, shading, corrosion, and nighttime load settings before replacing anything.
Inspect Controller Wiring, IP65/IP66 Seals, and Night-Mode Settings
Why Is My Solar Street Light Blinking Green?
A blinking green light usually comes from the controller, not the LED lamp. Its meaning varies by controller design. In field inspections, I have found loose battery wires causing misleading status signals. Turn off the system before checking terminals. Confirm positive and negative cables are correctly connected. Tighten screws gently, because damaged terminals can create unstable contact. Inspect the solar panel cable for crushed insulation or water marks. A multimeter can reveal low battery voltage or poor daytime charging.
The enclosure also deserves close attention. An IP65 seal resists dust and water jets, while IP66 offers stronger water-jet protection. Neither rating excuses damaged gaskets or loose cable glands. Look for flattened seals, cracked covers, and condensation near the controller. Dry moisture carefully, then replace worn sealing parts. A small gap can become a serious nighttime fault. I once focused on the controller and missed water entering through the cable gland.
Tips: Check night-mode settings before replacing parts. Some controllers blink green during standby, dimming, or scheduled operation. Verify the clock, brightness profile, motion sensor setting, and low-voltage protection. Compare the observed pattern with the installation manual. Do not assume every green blink means failure. Record the blink interval, battery voltage, and weather conditions. This simple record can expose patterns that a quick inspection misses.
Conclusion
If you are wondering, “why is my solar street light blinking green,” the light is usually communicating a system status rather than indicating an immediate failure. A blinking green LED may mean the controller is charging the battery, detecting normal operation, or switching between charging and lighting modes. Start by checking whether the battery is rated at 12 V or 24 V, then compare its measured voltage with the controller’s green-LED status pattern. Also review the night-mode settings, as an incorrect schedule or sensor setting can cause unexpected behavior.
For a more complete diagnosis, measure the solar panel’s output in full sunlight, both without a load and while the system is operating. A weak reading may point to shading, dirt, damaged wiring, or panel degradation. Test the battery’s usable capacity as well; many systems treat approximately 80% of the original capacity as the end-of-life threshold. Finally, inspect controller connections, cable polarity, moisture protection, and IP65 or IP66 seals. Loose wiring, water entry, or a poorly configured controller can all trigger a blinking green indicator.

 Zeteo Light